Sonarqube with Java 17
![]()
Today we will learn how to setup a Sonarqube Environment which works correctly with the latest Java JDK version 17.
We will also see how to perform the automatic update of the reports at each push on the remote repository through the GitHub Actions’ services.
Requirements
- Machine with your favourite linux distro
- At least 2GB RAM
- At least 1 CPU core
- Docker & Docker-compose
- Maven
- A Java project
Install Sonarqube
The first step consists into installing the Community Edition of Sonarqube, which is free and almost fully functional for Java.
In order to do this, we have to access our installation folder, like this
mkdir sonar
cd sonar
We will then create the docker-compose file, with the commandnano docker-compose.yml
At this point, we’ll have to set the following configuration in the docker-compose file:
version: "3"
services:
  sonarqube:
    image: sonarqube:community
    depends_on:
      - db
    environment:
      SONAR_JDBC_URL: jdbc:postgresql://db:5432/sonar
      SONAR_JDBC_USERNAME: sonar
      SONAR_JDBC_PASSWORD: sonar
    volumes:
      - sonarqube_data:/opt/sonarqube/data
      - sonarqube_extensions:/opt/sonarqube/extensions
      - sonarqube_logs:/opt/sonarqube/logs
    ports:
      - "9000:9000"
  db:
    image: postgres:12
    environment:
      POSTGRES_USER: sonar
      POSTGRES_PASSWORD: sonar
    volumes:
      - postgresql:/var/lib/postgresql
      - postgresql_data:/var/lib/postgresql/data

volumes:
  sonarqube_data:
  sonarqube_extensions:
  sonarqube_logs:
  postgresql
  postgresql_data:
Save and exit, and then start the docker-compose services by typing
docker-compose up
The docker-compose instance will be started.
If you want to detach logs from your terminal, you can run
docker-compose up -d
Configure Sonarqube
Once installed, you can access Sonarqube interface by putting, in your browser’s URL bar, the addresshttp://<YOUR-SERVER-URL>:9000
You will be redirected to Sonarqube access.
As usual, you can login with
- username: admin
- password: admin
Of course, you can change the admin password in any moment from the web GUI.
Generate Access Token
In order to push automatically reports to Sonar, we have to generate an access token for our GitHub action.
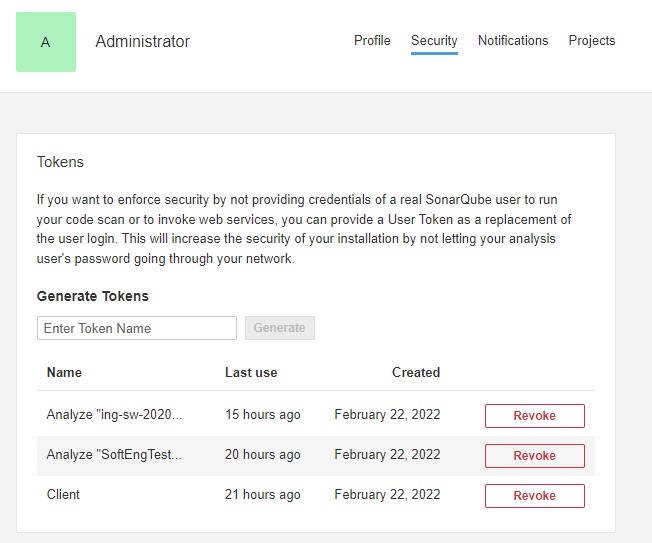
This job can be done with the following steps:
- navigate to My Account->Security->Tokens;
- enter token name (e.g. GitHub Actions);
- click on Generate
The token will be displayed only one time, so please copy and store it in a safe place. We will need it in GitHub actions steps.
Configure Maven
In order to be able to push analysis to Sonarqube, you’ll have to import the Sonarqube plugin, together with the Jacoco plugin for generating code coverage reports.
Add Sonarqube plugin
Add the following snippets to your pom.xml file, by substituting SONAR-VERSION with the version of the plugin that you need.
You can look for versions in Maven Central Repository.
<pluginManagement>
    ...
    <plugin>
        <groupId>org.sonarsource.scanner.maven</groupId>
        <artifactId>sonar-maven-plugin</artifactId>
        <version>SONAR-VERSION</version>
    </plugin>
    ...
</pluginManagement>
Add Jacoco Plugin
Add the following snippets to your pom.xml file, by substituting JACOCO-VERSION with the version of the plugin that you need.
<plugins>
    ...
    <plugin>
        <groupId>org.jacoco</groupId>
        <artifactId>jacoco-maven-plugin</artifactId>
        <version>JACOCO-VERSION</version>
        <executions>
          <execution>
            <id>default-prepare-agent</id>
            <goals>
              <goal>prepare-agent</goal>
            </goals>
          </execution>
          <execution>
            <id>jacoco-report</id>
            <phase>test</phase>
            <goals>
              <goal>report</goal>
            </goals>
          </execution>
        </executions>
      </plugin>
    ...
</plugins>
Configure GitHub
In order to automatically generate reports and upload them to SonarQube platform, a GitHub actions has to be configured in the repository.
First of all, we have to add several things to repository’s secrets.
- From the GitHub repository, navigate to Settings->Secrets->Actions.
- Create the following repository secrets:
- SONAR_TOKEN: the token generated during Sonarqube configuration.
- SONAR_HOST_URL: the URL of the running sonar instance (i.e. http://
: ) - REPOSITORY_OWNER: the nickname of the person who created the repository (e.g. PiroX4256)
- REPOSITORY_NAME: the name of the repository
- Save and go back to repository.
Now, in the root of the repository, create the following folders/file.github/workflows/report.yml
Copy and paste the following action as the content of report.yml file, changing only the java-version variable according to the installed one.
name: Build
on:
  #schedule:
    #- cron: '55 17 * * 2'
    #- cron: '30 16 * * 2'
  push:
    branches:
      - master # or the name of your main branch

jobs:
  build:
    name: Build
    runs-on: ubuntu-latest
    steps:
      - uses: actions/checkout@v2
        with:
          fetch-depth: 0  # Shallow clones should be disabled for a better relevancy of analysis
      - name: Set up JDK 17
        uses: actions/setup-java@v1
        with:
          java-version: 17
      - name: Cache SonarQube packages
        uses: actions/cache@v1
        with:
          path: ~/.sonar/cache
          key: ${{ runner.os }}-sonar
          restore-keys: ${{ runner.os }}-sonar
      - name: Cache Maven packages
        uses: actions/cache@v1
        with:
          path: ~/.m2
          key: ${{ runner.os }}-m2-${{ hashFiles('**/pom.xml') }}
          restore-keys: ${{ runner.os }}-m2
      - name: Build and analyze
        env:
          GITHUB_TOKEN: ${{ secrets.GITHUB_TOKEN }}  # Needed to get PR information, if any
          SONAR_TOKEN: ${{ secrets.SONAR_TOKEN }}
          SONAR_HOST_URL: ${{ secrets.SONAR_HOST_URL }}
        run: mvn -B verify org.sonarsource.scanner.maven:sonar-maven-plugin:sonar -Dsonar.projectKey=${{ secrets.REPOSITORY_OWNER }}_${{ secrets.REPOSITORY_NAME }}
You are done!
At each push, the GitHub action will trigger and will upload the report on your remote sonarqube instance.
![[SoftEng22] Configurazione repository per Sonarqube](https://www.sonarqube.org/index/sq-homepage-og-image.png)